Tuesday, September 20, 2011

Finally!


I apologize in advance for such a long-winded post. I warn you it contains quite a bit of poor poor pitiful me, with, hopefully, a glimmer of hope at the end. But it's also a bit boring, so if you don't read all this, believe me, I will NOT be offended. :)

My first Finally! is because I have finally made THE card. You know the one. The one that you've wanted to make since you'd discovered the art of making cards, but have never quite achieved. The one that makes your heart skip just looking at it because all of the pieces, inside and out, are dancing together in perfect harmony. The one that is your Starry Night, Cherubs and Mona Lisa all rolled into one. 

I have finally made that card. Okay, it's not the Mona Lisa, but the card that I am absolutely satisfied with has eluded me for so long, it comes awfully damn close!

Honestly, clever does not come easy to me and I'm not really very creative. What I am good at, however, is being able to look at something and know whether or not it works. I say this because the things I love most about this card were actually ideas I saw elsewhere, and I am very grateful to those who generously put their ideas out there to inspire the unspired masses, like me.

 For example, I got the idea for this little birthday circle from My Mind's Eye. I had bought some embellishments from its Lost and Found Christmas collection, which contained something almost exactly like this one. It was incredibly easy, and I think it's cute as can be, but it's not something I would have thought of on my own. (Yeah, I know MME makes a profit from putting their ideas out there, but I LOVE the ideas, so I am still grateful.)
My second Finally! is that I finally got all of my glitter--gobs and gobs of glitter--to stick where I wanted it to! Well, except for the glitter that's in my hair, my diet soda, and the dog's poop, that is. :) 

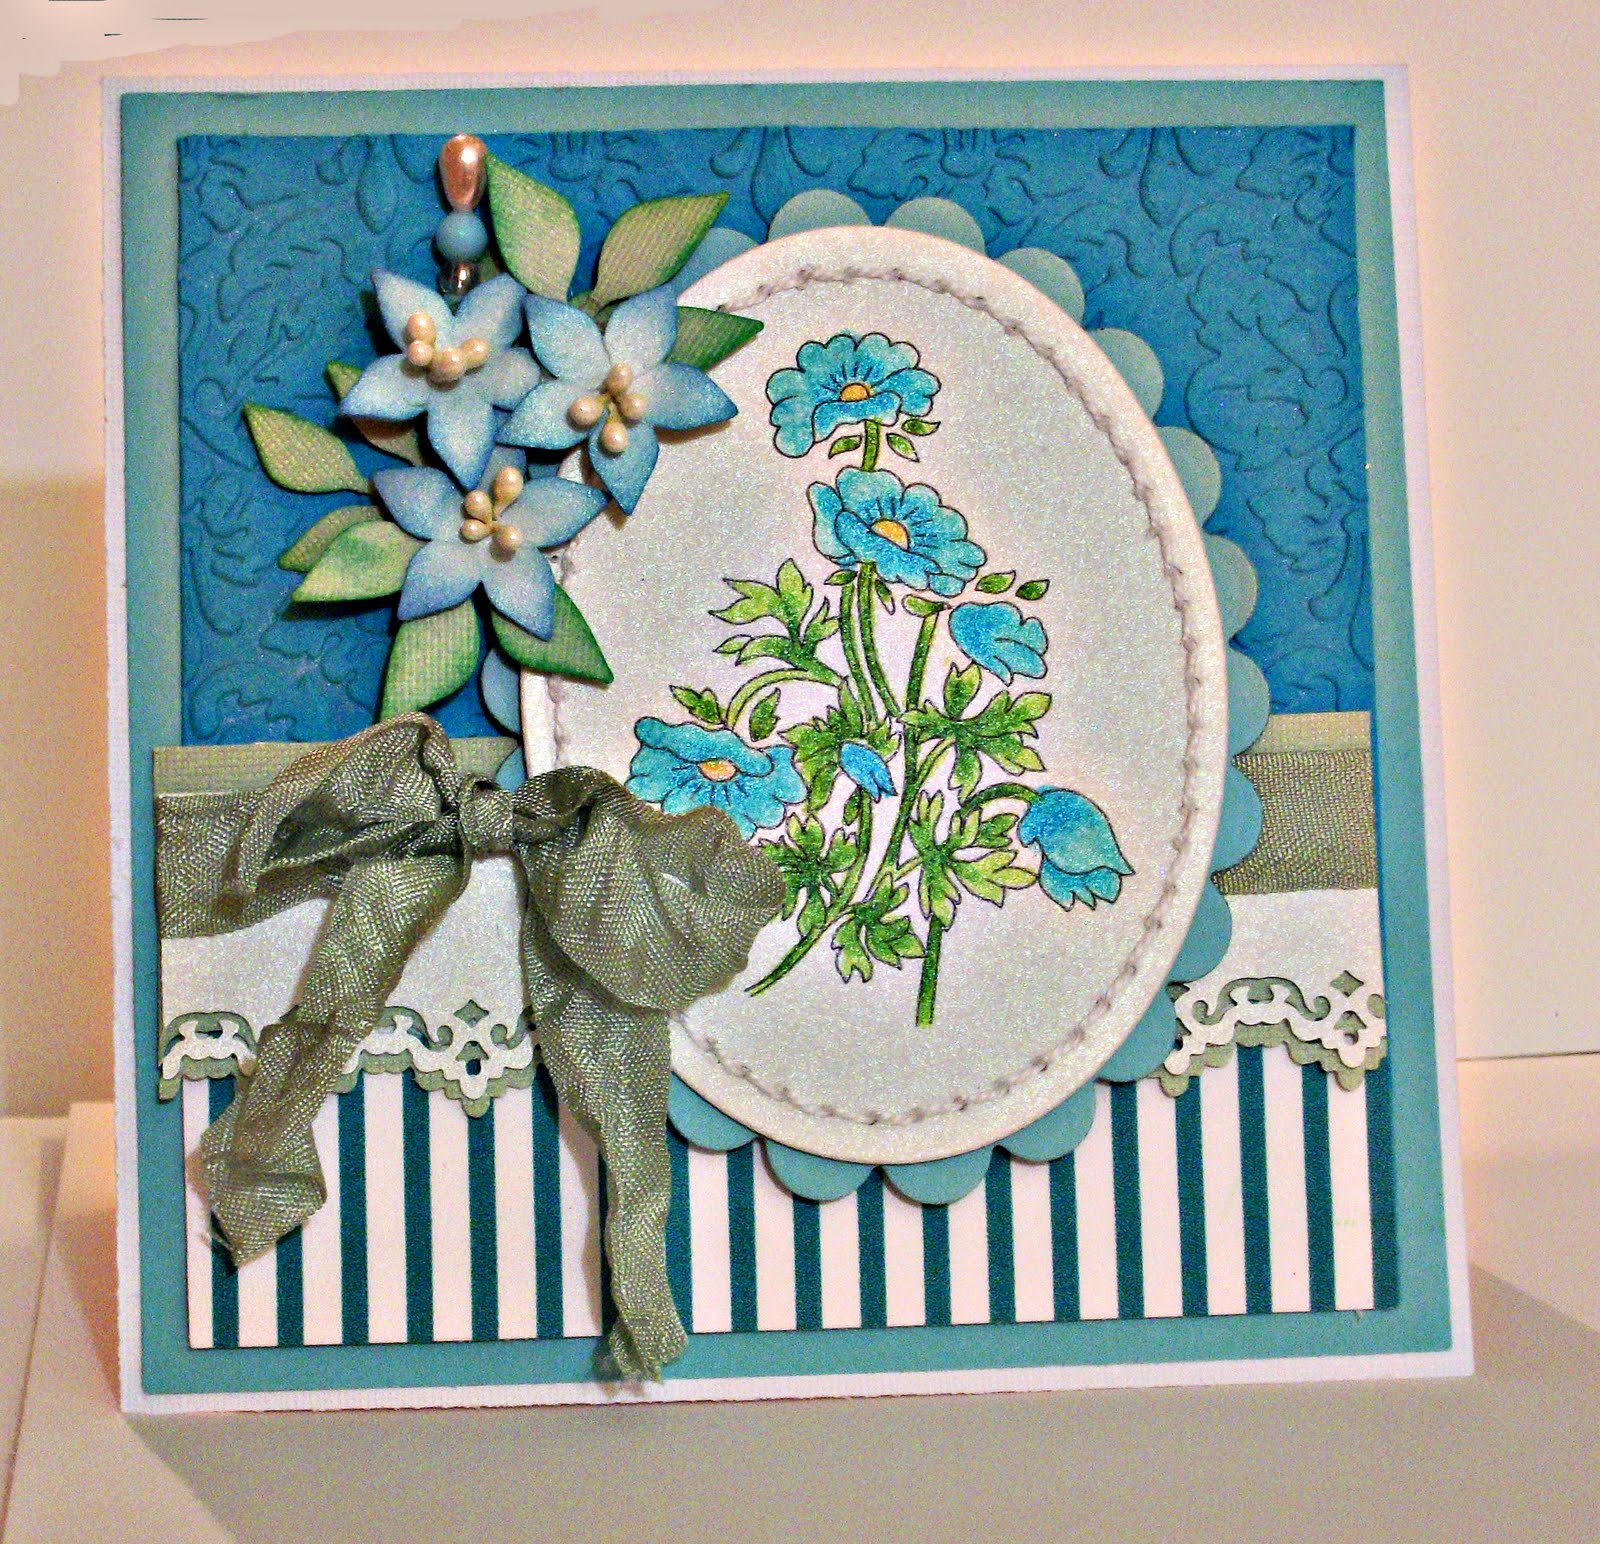
I absolutely LOVE glitter, but rarely use it because I've never been able to make it stick, especially when I want it to adhere to a stamped image. But I recently discovered the stupendous Scrap Happy Sheer Glue. It is the crack cocaine of glue in that it thinks it is ALL POWERFUL and can lift vst amounts of powdery substances with its little finger. Well, guess what? It can! That's because it dries sticky and stays that way until you stick something to it--like the tons of glitter I used on this card. Seriously, I've spent a small fortune on adhesives just for glittering purposes, including Sticky Stuff and glue pads, with very limited success. With the discovery of the Scrap Happy glue, my next project will be huge, gorgeous swirls of glitter--all over my bedroom walls!

In keeping with how others inspired me, my third Finally! is because I finally distressed a card, and it worked! I've tried distressing a number of times, but for some reason, it's always just looked like someone took a pair of scissors to the paper and then shoved it in mud, so I'd given up. But then I got very, very lucky and  happened upon  Clare's Creations. Seriously, my jaw is out of joint because I spent so many hours with it stuck to the floor while taking in one gorgeous work of art after another. Eventually, I began to see how I could combine the way Clare distressed her cards with some of my ideas, and voila! No more mud! I really think this took my card to the next level, and I am so grateful to Clare. If you're looking for inspiration, drop by her blog. You may not be able to chew for a while afterwards, but it will have been worth it.

My fourth Finally! is because I was able to finally stitch something close to a straight line!. I stitch by hand, and have thrown away a gazillion cards because the stitching always looks wonky. But this time, while the stitches aren't perfect, the overall effect is of straight lines, and I am ecstatic about that! :)

My fifth Finally! is that I finally decorated all sides of the card, inside and out. I utilized stamping techniques I've always been to nervous to try, like stamping layers of multiple images, and though it's hard to tell from my poor photos, they turned out very pretty. I also made a ton of embellishments and stuck them everywhere. (I purposely placed the black frame off-center, but it's not as out of kilter as it appears in the photo.) There are even flowers on the back of the card, which is probably a bit weird, but it works. The thing is, I've decorated the inside of cards before, but it wasn't until I saw how Clare did it that I realized I needed to step it up a notch. This is yet another example of how inspired I was by others who so graciously share their talents with peons like me.

My last, and most important Finally! is that I finally feel like I've gotten some of my Mojo back. I am disabled with Chronic Fatigue Syndrome/Fibromyalgia, both of which are extremely debilitating. I lead a very lonely, isolated life because I am unable to get out and about like normal people. I've been ill for eleven years this month, with the vast majority of that time spent full of despair and depression, and obsessing about how to end it all.

Then, about a year and a half ago, I discovered paper crafts, and for the first time, in literally a decade, I felt enthusiastic about something. Even though I had to craft from my bed, it was just so much freakin' fun I happily slept with the glitter, scraps of paper, ribbon, ink pads, more scraps of paper, punches, markers, and yet more scraps of paper, not caring a bit. All I knew is that I had finally found something to do other than being stuck inside my head feeling dead, and I was content.

Then a couple of months ago my illness got much worse. Other things happened as well that dragged me down that I won't go in to. But the pain has been unbearable, so much so that all I am is "pain." One of the symptoms of FM/CFS is a severe reduction in cognitive abilities, and I always struggle with that. But when my illness gets as bad as its been these last few months, I can't think at all--it's just one huge black fog of pain. This led to the loss of my enthusiasm for crafting, and I crashed. Bad. Scary bad. Suicidal bad. I know that sounds ridiculous, but making cards has been my life for over a year, and if I can't do that, I don't know what I'll do.

So, when I was able to pull this card together, and actually enjoy doing it, that was HUGE. I was very afraid I'd lost my love of creating permanently, and frankly, I'm still worried. Perhaps that giddy enthusiasm for it is gone, forever, which was probably inevitable. But I felt exuberant again as I watched this beautiful card come together in my hands, and that encourages me that I will again.

I have no illusions that things are fine. They're not, and I'm grasping at something to hang onto every moment. But the fact that I spent an entire day outside of my head, happily getting glitter everywhere, means something, and I just want to shout Finally!

Recipe:

My Mind's Eye Lost and Found Union Square papers
My Mind's Eye Princess stamps (birdcage)
Heartfelt Creations Bella Rose stamp
Fiskars Make a Wish (Lincoln quote)
Stampin' Up Circles of Friendship "Sending You Birthday Wishes" stamp
Stampin' Up Bliss stamp
Autumn Leaves Cling Rubber Stamp (Vintage Birdcages)
Spellbinders Nestabilities Labels One dies
Spellbinders Donna Salazar flowers
Spellbinders Heartfelt Creations Bella Rose die
My Mind's Eye Lost and Found Christmas brads
Scrap Happy Sheer Glue
Lots and lots of red glitter
Black Pearl Cotton Floss

Challenges:

Anything Goes~anything goes
Cards and More--red, brown and cream
Scrap Creations~anything goes
Die Cut Dreams~at least five flowers 
Incy Wincy Designs~distressing
Kaboodle Doodles~lots of layers
Nettie's Digital Gems--anything goes
Ooh La La Creations--punches/dies
Pollycraft Monday Challenges--swirls and pearls 
Stamp with Fun~anything goes
Stamps & Fun = Creativity--shapes and/or die cuts
There She Goes~Birthday with Pizzaz 
Corrosive Challenges~punches and/or dies
CES Challenges~Use at least four different types of embellishment.
Di's Digi Designs~anything goes
Easy Craft Projects~at least six different patterned papers
Crafty Ann's Challenge Blog~something out of your comfort zone (Mine was distressing and stitching.)
Cute Card Thursday~anything goes
Paper Play Challenges~punches/dies cuts
Ruby's Rainbow~for a girl

Thursday, September 8, 2011

For the Bachelorette

My daughter asked me to make a card for a friend's bachelorette party, and this is what I came up with. This was actually one of the hardest cards I've ever made because I cut it out by hand, and getting the round part accurate was not easy. I also generated the sentiment on the computer, so positioning the template so the words would be in the right spot took a few takes. Finally, getting the bra and panties to look exactly right took even a few more takes. But, when it finally came together I was very happy with it.


I absolutely LOVE the paper I used for the bra and panties. It's actually a fabric paper that's made in India  and is very similar to eyelet with sparkles in the holes. It was expensive though--$1.99 a sheet! I had a 20 percent discount coupon, so that helped, but lord almighty, that's a lot of money for one sheet of paper!

 I know it's hard to see, but the sentiment reads: Even though you're getting married, you'll always have your assets. My daughter came up with that, and to be honest, I'm not crazy about it. But, I was unable to come up with anything better on my own, and it's what she wanted, so I let it go.

I am indebted to Stamp Owl who provided the template I used to make the card.

Materials:

C'oredinations brown paper
The Paper Company Silver Dot fabric paper
Fiskars Lace border punch
Disney pink rhinestones
Recollections rhinestone hearts
pink roses and seam binding ribbon bow from stash

Challenges:

Aud Sentiments--for a girl
Craft Creations--anything but a square
Truly Scrumptuous--decorate the inside of the card.
Paper Take Weekly--anything goes or a shaped card

Wednesday, September 7, 2011

Trying Something New


There were a couple of inspirations for this card. First, and foremost, I discovered the extraordinarily talented Sue's Particraft blog where she does amazing things with intricate die cuts, especially the way she layers them. I have quite a few dies myself and decided to give it a try. Second, I recently won a blog candy that included a set of 8" x 8" cards with matching expandable envelopes to accommodate a 3-D card. I LOVE these envelopes, and even though 8" x 8" is larger than I'm used to, it turned out to be just the right size for the dies. 

I know I keep saying this, but I soooo wish I were a better photographer. This photo doesn't really show the card's intricacies very well, which is what makes it beautiful. So often I make a card that I feel so-so about. I like it, but then when I think of giving it to someone, I hesitate. But I think this is one of my favorites, and I will have no qualms handing it out when Christmas rolls around. If you click on it, you'll be able to see the die cuts better.

Recipe:

My Mind's Eye Lost & Found papers
Recollections deep purple shimmer paper
Martha Stewart Punch Around the Page Punch
Fiskars border punch
Spellbinders In Spades Pendant Die
Spellbinders Fleur de Lis Pendant Die
Spellbinders Labels Four die
Inkadinkado Winter Silhouettes acrylic stamp (sentiment)
I'm not sure who makes the poinsettia stamp, but it's acrylic and I purchased it at Michael's last year.
Stampendous transparent embossing powder
Stampendous white opaque embossing powder
Colorbox pigment ink--Chianti
Recolllections rhinestones and pearls

Challenges:

Little Red Wagon--diecut(s)
Ladybug Crafts Inc--anything goes
Oldie But A Goodie--Christmas in September (the sentiment stamp is 9 months old)
Paper Take Weekly--anything goes
Crafty Boots Challenge--anything goes

Sunday, August 21, 2011

A Thousand Sheets of Paper


Seriously, Amy at A Thousand Sheets of Paper has, literally, a thousand sheets of paper up for grabs on her blog. I've never actually looked at that much paper all at one time before. Can you imagine winning something like this? Well, actually, I CAN! :) :) Head on over to Amy's blog to enter!

Saturday, August 13, 2011

Fifty Years--Wow!

I made this card for my mother to give to some dear friends of hers who are celebrating their 50th wedding anniversary today. I loved Mojo Monday's sketch, which is both easy to follow and absolutely gorgeous, and really like how it turned out. 

I am always excited when someone asks me to make a card for them, because it gives me an excuse to buy more paper! Something I never have enough of! Which is exactly what I did here! Beautiful beautiful paper! Paper paper paper!!!!

Can you tell I have a bit of an addiction? :)

Recipe:

K&Company Elegance papers (LOVE THIS!)
K&Company Elegance bling
Recollections tiny roses
Recollection gingko leaves
Spellbinders Circle and Scalloped Circle dies
EK Success border punch
Martha Stewart border punch
Recollections pearl and lace border
Tim Holtz button
Stick pins I made
Scrunchy seam binding from stash

Challenges:

Mojo Monday--sketch
Totally Gorjuss--something round
Crafty Ann's Challenge Blog--scallops and/or fancy borders
Wags 'n Whiskers--sparkly
Ruby's Rainbow--gems
The Sisterhood of Crafts--anniversary
Stamp 'n Doodle--ribbon, die cut and pearls
Quirky Crafts Challenges--numbers

Friday, August 12, 2011

Perfect Timing


This card is the result of the perfect timing of two of my favorite challenge blogs: Midnight Madness (sketch) and Lily of the Valley (thank you card), plus one blog new to me: Gltter Geeks (photo inspiration). I had already bought the paper on sale from Michael's, and immediately knew the California Poppy Thank You digistamp I had nabbed from Operation Write Home would be perfect for it, but I had no immediate need for a Thank You card, that is, until I came upon LOTV's challenge. So, with all three challenges in mind, I went for it, and the result is the card you see above. 

Recipe:

K&Company Watercolor Bouquet paper
Recollections Hot Pink Gingham paper
Recollections light blue pearl paper
C'oredinations yellow pearl paper
Spellbinders Nestabilities Lacey Squres 
EK Success border punch
Sizzix branch with leaves die
Copics
Button and Pearl Cotton thread from stash

Challenges:

Midnight Madness--sketch
Lily of the Valley--thank you card
Glitter Geeks--photo inspiration
The Poodles Parlor--Round and Round the Garden
The Stamp Man--anything goes with summer colors
Craft us Crazy--anything goes


Tuesday, August 9, 2011

I'm on a roll!


I have yet another card to show you today. I've sold a few things on e-bay, and I always include a Thank-You card in the package. I've only done this about six times, so it's not a big deal, but it always gives me an excuse to play, and I had a lot of fun making this card. I followed Inspirational Card Sketch's sketch on this one, and quite like it. 

I wish I were a better photographer, because the colors are much more vibrant IRL. I've been playing around with lighting and stuff, trying to get more accurate pictures, but this one just wouldn't cooperate. I even purchased an "Ottlite" lamp, hoping it would make the colors more accurate, but it obviously didn't help, for this card's pink is very pink, not coral like it's showing here, and the colors of the flowers are much deeper than what you see.  I've seen some people set up very elaborate photo staging, and to be honest, I thought it was much ado about nothing. Now, I wish I'd paid more attention, because I could use some of that ado!

Recipe:

Basic Grey's Out of Print papers (Still love them!)
Recollections light-blue pearlized paper
Stampendous Flower Fields Woodland stamp
Spellbinders Lacey Squares die
Spellbinders Pennant die
EK Success Border Punch
Stampendous transparent embossing powder
Copics
Colorbox black pigment ink
Recollections sparkly butterfly
Seam binding ribbon from stash

Challenges:

Bearly Mine--Charm the spots off you (use spots)
Ladybug Crafts Ink--favorite stamp (This really is my favorite stamp, even though I don't use it much. I was very happy to see it work on this card.)
Incy Wincy Designs--Something Old and Something New (the stamp is old, the Spellbinders Lacey Squares die is new ((just bought it today!))
The Poodle Parlor--something found in the garden

Notecard for My Sister-in-Law


I am making a set of monogrammed notecards for my SIL's upcoming birthday, and absolutely love how this one turned out, so much so that I decided to enter it in a few challenges.

I started out with three musts: the paper, the bling, and a layout different from the other notecards I'd already made. It took me the better part of the day to finally make it work, but once it did, it became my favorite card of the set.

Recipe:

Blue flowered paper from Joann (I'm not sure of the designer's name, but it's always in stock at Joann's.)
C'ordinations pearl white and navy papers
Recollections light blue pearl paper
Monogram "S" stamp
Recollections bling swirls
Tim Holtz button
Spellbinders Square, Scalloped Square, Circle and Scalloped Circle dies
EK Success border stamp
Cuttlebug Embossing Folder: Kassie's Brocade
Colorbox Midnight Pigment Ink
Seam binding from stash
Stick pins I made

Challenges:

Crazy Amigos--anything goes
Sweet Stamps--bling
Karen's Doodles Challenge Blog--buttons and bows
Ellphantastic--layers

Saturday, August 6, 2011

Sweet Sketch Wednesday sketch.


My newest favoritest choicest bestest-loved paper is Basic Grey's Out of Print. I LOVE LOVE LOVE it! So, I went in search of a sketch I could follow that would highlight the paper and found one the fit perfectly at Sweet Sketch Wednesday. In fact, while paper is always a fundamental element to any card, I would say these papers, literally, decorate the card.

I don't have anyone in mind for this card, and will probably add a sentiment when an occasion arises, but maybe not. Hmmm. . . I'm thinking. What do you think?

I used a fun technique on the birdcase. First I heat embossed it in opaque white, then in clear enamel, and it looks like an aged white birdcage IRL. This probably sounds weird, but I really like it when I use a technique that makes an element almost look like I purchased it that way, yet anyone who takes the time to look at it will know I did it myself.

Recipe:

Basic Grey Out of Print papers
Tim Holtz Alterations birdcase and bird die
Stempendous white opaque embossing powder
Stampendous enamel embossing powder
Tim Holtz decorative button
Stick pins I made
Trim and crinkled seam binding from stash

Challenges:

Bearly Mine Challene--Charm the spots off you.
Clearly I Stamp--Things with wings.
Glitter Geeks--Furry and/or feathered friends.

Sunday, July 31, 2011

So Proud of my Daughter


My daughter is going through a really difficult time that started a year ago, and included a broken engagement, the loss of her job and inability to find a new one, that kind of stuff. She's up and down, but lately has been very depressed, so I decided to make her a card with a sentiment that describes her perfectly: Courageous and Vulnerable. It's what I love about her, and what I believe will get her through all this.

I'm still feeling like I've lost my Mojo. I remember when I used to read other people say that and couldn't believe it had happened. All I thought about for a year was making cards, and it kept me going. I've also read other people get theirs back, and I'm hoping the same will happen for me. Blah blah blah. :)

Recipe:

Making Memories English Garden papers
Recollections pearl stickers
EK Success border punch
Spellbinders Nestabilities Labels Four dies
Digital stamp of girl (I'm sorry, I don't know where I found this.)
Stickpins I made
Flowersm ribbon and seam binding from stash

Challenges

The Shabby Tea Room--green, pink and yellow
Mami Doodles--flowers


Saturday, July 30, 2011


My newphew, Kyle is celebrating his 20th birthday this Monday. He is on a mission for the Mormon Church, so I made some monogrammed notecards so he can dash off quick notes to his family and friends. I put the cards in one of the drawers shown here, and the envelopes in the other. I purposely stayed away from many embellishments, which was HARD! I hope he likes it.

I'm not entering it into any challenges because I don't feel it's good enough. I'm not sure what's going on with me, but I am having to force myself to work on my cards lately. I'm a little worried about that because, for over a year now, it's been how I cope with being disabled. I don't get out much, but was always happy when making cards. Now . . . not so much, and depression is seeping back in. I hope it doesn't last.

Thursday, July 28, 2011

I won!

I am soooo excited! I won this fabulous blog candy from Rea at The Antique Warrior blog. I about fell out of my chair when I saw my name. Thank you so much, Rea!

Ends July 25

Jacque's Joie de Vivre Blog Candy


Jacque has asked us to write a post so people will see the wonderful Scor-pal candy she has up for grabs on her blog. I get very little traffic here, but am glad to do my part for her. The contest ends July 31, so hop on over now to Jacque's blog to enter.

Thursday, July 14, 2011

Spencer's Waterfall Birthday Card


My nephew, Spencer, is a genius. Certifiable. One day he will win the Nobel, the Pulitzer, and a Grammy, all in the same year. So, when it comes to designing a birthday card for him, man, do I feel the pressure! Last year I made him a never-ending card because he loves all things mechanical, and he loved it. That was a HUGE compliment to me because, the truth is, Spence and I have never really been close. That's mostly because we don't see each other often, but also, because I'm an old lady, and not a genius. :) So, when he CHOSE to display last year's card on his bedroom wall, that was huge to me. But . . . now ..  . . it also means even MORE pressure this year to top last year's card!

In keeping with the "mechanical" theme, I chose to do a waterfall card this year, and I think he'll get a kick out of it. Basic Grey's Oxford collection was perfect for this, especially the mathy papers. I love how they look on the "waterfall" part of the card. It took me a long time to figure out what else to do on each panel, and my inspiration came from a Stampin' Up's Alphabet Soup stamp. Once it occurred to me to play with the placement of the letters, the card came together quickly.

I was also pleased when I came up with an idea for the inside of the card. I was sweatin' it at first because I had had to make the card fairly large to accommodate the waterfall. I can only write "I love you and have a wonderful birthday" so many different ways on the inside of the card! But when it hit me that banners would be a perfect, once again, it came together very quickly. 

Recipe:

Basic Grey Oxford papers
C'ordinations light blue sparkly paper
C'ordinations gold sparkly paper
Martha Stewart border punch
Various Cuttlebug alphabet dies

Challenges:

Southern Girls--Happy Birthday
Crafty Creations--Boyz to Men
Ruby's Rainbow--Happy Birthday


Wednesday, July 13, 2011

Cindy's blues blew me away.


Last night, I was surfing the net looking for nothing in particular, but, as always, hoping for some inspiration, when I came upon this drop-dead-gorgeous card over at the Flourishes website. I was immediately taken with the gorgeous blues she used in her stunning design. So, I CASEd it. Unabashedly and unashamedly. And my card still doesn't even come close to the exquisiteness of Cindy's card. But, I wanted to make this a smaller card so I could include it in the set of notecards I'm making for my SIL, and space was limited. I tried adding a few more embellishments, but every time I did it went over the top. So, while I couldn't get any closer to Cindy's card, I thought I'd stop while I was ahead. 

Aw, who am I kidding? I don't think I could ever make a card as stunning as Cindy's. It really is that amazing.

I did add a new technique to this card--stitching--and was, FINALLY, satisfied with it. I've tried to stitch on cards before, always by hand because I don't have a sewing machine, and I've never been happy with them. A few times I've just thrown the thing across the room! 

I explain how I was able to get the stitching right at the bottom of this post. It's a fairly long paragraph, so I wanted to make it possible for you to skip it if you chose. But, the fact that the card is still on this side of the room ought to tell you I figured out something! :)

Recipe:

The Paper Company papers from Joann, in blues. (I don't recall the actual name of the collection.)
Striped paper I designed
Digital flower stamp 
Spellbinders Nestabilities Oval and scalloped Oval
Cuttlebug Textile Texture embossing folder
Sizzix branch with leaves die
McGills Petite Petals punch
EK Success border punch
Copics
Seam binding ribbon died in a sage green and crumpled up.
Stick pins I made. (I just noticed one of them had fallen off! Yikes!)

Challenges:

Freshly Brewed Challenges--three of anything
Simon Says Stamp--anything goes
Creative Craft Challenges--pretty blossoms
Flourishes--embossing (I'm embarrassed to enter this since I so unashamedly copied Cindy's card, but what the hell!)
Jac-Inks Papercraft Challenges--die cut and texture

How I did the stitching: First, I cut an oval from my Nestabilities, traced it, then scanned the image into my computer. I then traced the scanned oval in my Digital Scrapbook Artist program using the drawing pen. Next, I changed the line to dashes, changed the line's color to a very light gray, and then printed it out. I cut the oval from my die, then poked a hole in each dash, stitched it up, and voila! It actually doesn't look half bad. It took me almost all day to get the oval just right, as I had to tweak its height and width many times, and even then, it's not perfect. But it is very close.

Tuesday, July 12, 2011

Notecards for my sister-in-law.


Lately, for the really special women in my life, I've been making a set of monogrammed notecards for their birthday. I know "sets" of notecards are all supposed to match in some way, but I get really bored with that. So, the way mine match is I use a monogram, and I use my favorite papers. Other than that, it's a free-for-all! 

My SIL has a birthday coming up in August, so I'm trying to get a head start with this card. I went a bit out of my comfort zone with so many squares, but I think it works. I was actually struggling to find a paper that matched the blue background paper, and finally found I had the perfect paper in my digital collection!

Recipe:

My Mind's Eye 29th Street Market paper
Arise digital paper by Dana Zarling at Design House Digital
C'ordinations brown pearlized paper
Spellbinders Nestabilities squares and scalloped squares
Monogram stamp
stick pins I made
Prima rosebuds

Challenges:

Creative Craft Challenges--pretty blossoms
Digital Tuesday Challenge--use one or more dies

Monday, July 11, 2011

Crafting Life's Pieces' Sketch


I came upon Crafting Life's Pieces, via a link to a link to a link (in other words, I'm not sure how I got there), and I am so glad I did. I was just blown away by the gorgeous cards there, and what made it even better is they also have a monthly sketch challenge blog. So, while the card above doesn't even come close to the loveliness I found there, I am happy with how it turned out.

What took me forever was taking a picture of it. I purposely used very pale pinks, blues and greens, with the black as a strong contrast, and I had a heck of a time getting my camera to pick the pale colors up. I'm not very good at photography as it is, so this about did me in. But, I finally got close enough to the real thing that I was satisfied.

What I really love about this card is the stamp. It's Stampin' Up's Elements of Style, and I've coveted it forever. But appearances are deceiving. It's actually the digital version of the stamp! I was so excited when I discovered it for sale at the Stampin' Up website, because I've just not had the money to buy the rubber version. And best of all, while the rubber version would have been too large for my card, I was able to size the digital version down a bit, and I couldn't be happier.

Recipe:

My Mind's Eye Lost and Found papers
My Mind's Eye Lush papers
Stampin' Up Elements of Style digital stamp
Stampin' Up Best Wishes stamp
Black paper from scraps
EK Success border punch
Sizzix Branch w/Leaves die
Sizzix Architectural Accent #3 die
Spellbinders Nestabilities Labels One
Distress Inks Bundled Sage
Distress Inks Tea Dye
watercolors
Recollections pearl stickers
seam binding died pale pink
stick pins I made
mulberry paper flowers from stash

Challenges:

Crafting Life's Pieces--sketch challenge
Make It Monday--anything goes
Aud Sentiments Challenge--use a sentiment with two words
Stampavie and More--More than three layers.

Sunday, July 10, 2011

The Most Amazing Blog Candy!


I don't usually write posts about blog candy, even though I am addicted to entering these kinds of contests. But Melissa at Creating from the Heart has such an amazing contest going on, I thought it was worth a post of its own. Up for grabs is a Spellbinders Grand Calibur machine, a set of Spellbinders Grand Labels 11 (the large ones), and a $150 gift certificate to Michael's! Can you believe that? I am salivating as I type this!

Additionally, her cards are just beautiful. I've spent the last hour going through her blog, and have found a few new ideas I'd like to try. Really, her stuff is gorgeous.

So, head on over to Melissa's blog and enter today. It really is the most amazing candy I've ever seen.

Thursday, July 7, 2011

For my Sis


For my sister's birthday I made her a book box card and filled it with monogrammed notecards. I was extremely happy with how it turned out, but was in such a hurry to send it off in time that I didn't take a picture of it. But I did take pics of some of the notecards, and the one above is one of my favorites, particularly because I got to use some of my very favorite papers. I was also very happy with the rosette because I finally figured out how to make one. I know how stupid that sounds, but I'm one of those people who can easily figure out a very difficult project, while the simple ones elude me. 

To make the monogram, I printed out the "T" on C'ordinations white pearl paper and then immediately covered it with Stampendous transparent embossing powder. These papers have such a smooth surface the printer ink doesn't dry immediately, and thus, embossing powders stick to it beautifully. My choices of what I can emboss on these papers is only limited to what images I can find, or can draw, on my computer. In other words, limited is really unlimited.

Recipe:

My Mind's Eye Adore paper
My Mind's Eye Asparagus paper
Basic Grey Olivia papers
C'ordinations white pearls paper
Recollections sticky pearls
ribbon from stash

Challenges:

Creative Belli Blog--make your own embellishments
Party Time Tuesdays--square card
Craft Your Passion--anything goes
Digi Design House--make your own flower(s)

Saturday, June 25, 2011

Just Add Ink sketch


I'm not exactly sure why, but when I saw Just Add Ink's sketch challenge, I was driven! Could it be because it was a great sketch? Yes, I think that's it. :)

This actually started out as a Christmas card. The paper is by My Mind's Eye and is aptly named Adore, because I truly do adore it! In fact, my local Roberts went out of business and the paper was on sale for 75 percent off, so I traveled around the state buying all the store's remaining sheets. I then ran home to make a card with it . . . and was stumped. I found that turning it into a card was difficult because the colors and the sparkle are so evocative of Christmas. So, then I decided to just give in and use it for holiday cards, including for Just Add Ink's sketch challenge.

But, I just wasn't happy with anything I did, and was having my own private "War FOR the Roses," because roses is what I really wanted. So, I gave in, and the result is what you see above. I quite like it.

Recipe:

My Mind's Eye Adore paper
C'ordinations paper
Sentiment from Stampin' Up's Roses in Winter
I Am Roses mulberry roses
Martha Stewart border punch
Sizzix leafy vine die
Stick pins I made
ribbon from stash

Challenges:

Just Add Ink--sketch
Totally Paper Crafts--spots and stripes (It's hard to tell in the picture, but the rectangle panel is made up of circles.)
Meljen's--stripes or plaid
Paper Crafting Journey--anything goes
Crafty Creations Challenge--sparkle
Ruby's Rainbow--flowers

Friday, June 24, 2011

Happy Birthday Shelly!


I followed Splitcoast Stamper's Sketch #330 to make this birthday card for my niece, and I really enjoyed it. It's the first challenge I've ever followed at SCS, and I'm a little concerned my card might not qualify because I added a bit to the top. It's my understanding that, at least amongst other challenges I've entered, as long as you can see the sketch you can do whatever you want; however, everyone at SCS who used this sketch seemed to follow it more exactly. So, I'm hesitant to post it there, but I'm going to, and if it's a problem, I'll just look at it as a "live and learn" situation.

Recipe:

My Mind's Eye 29th Street Market papers
My Mind's Eye Bohemia papers
C'ordinations purple paper
Rubber Stampeded stamp--hydrangea
Inkadinkado Stamp--Happy Birthday
Fiskars Birthday Sayings--Wish
Martha Stewart butterfly punch
EK Success large butterfly punch
Sizzix swirl die
Spellbinders Scalloped Circles
Spellbinders Labels No. 4
Fiskars border punch
Recollections Fleur Metallic Natural leaves
Recollections Fleur Natural Gingko Leaves
Recollections pearl stickers
Recollections rhinestone stickers
stick pins I made
ribbon from stash


Challenges:

The Poodles Parlor--flying things
Simply Create--things with wings
Stampin' for the Weekend--My Favorite Things: Mine are the color purple, My Mind's Eye papers, hydrangeas, and lots of sparkle (doesn't show up in the photo, but it's very sparkly in person).
Bronte and Bella's Challenge--flowers, fairies, flutters and/or fancy folds
Crafty Purple Frog Challenge--swirls and pearls
Southern Girls Challenge--anything goes
Little Darlings Challenges--Use your favorite color combination (mine is blue and purple).
Scrapbook Sisters--anything goes
Stampavie and More--butterflies
Deep Ocean Challenge--flowers
Everybody Art--anything goes
Creative Stamp Friends--birthdays

Monday, May 23, 2011

Die Cut Dreams Challenge Blog sketch


I recently made a set of notecards as a birthday present for my sister-in-law, and she absolutely loved them. My sister's birthday is coming up in July, so I've decided to make another batch for her. I followed the Die Cut Dreams Challenge Blog sketch to make the first card and think it turned out lovely. 

I was particularly happy with how the stamped image turned out. It was actually too wide to fit in the circle, so I masked off the edges, and wonders of wonders, it worked!

Recipe:

My Mind's Eye So Sophie papers
C'ordinations Pearls paper, red
Martha Stewart border punch
Stampin' Up stamp from Bliss collection
Stampin' Up Thanks so much stamp
Recollections red roses
Sizzix leafy vine die
Spellbinders Labels Four Nestabilities
Spellbinders Circle Nestabilities
Spellbinders Scalloped Circle Nestabilities
Stampendous Kaleidoscope embossing powder
Stampendous Opaque White embossing powder

Challenges:

Make it Monday--anything goes
Woodware USA Clear Stamps--anything goes
Card Makin' Mamas--1 image, 2 patterned papers, 3 embellishments

Sunday, May 22, 2011

Starting my new blog

I am completely illiterate when it comes to blogging. I had a blogger blog but was told I had to move to wordpress. I did that, and have never liked it because it's too cumbersome for me. I noticed other people were still using their blogger blogs, so I'm going to try and do the same. Thus, I am starting, yet again, another new blog.